Wednesday, June 29, 2016

ABS June Challenge

I adore the retro colors of the June challenge which features an art nouveau style poster showing a young woman reading a magazine.  I love the tangle of flowers wildly floating inside the frame.  I imagine her unbound hair would dance just as wildly were it set free.

  I felt that same wildness in the tendrils of my brain when I was creating these mini poly clay portrait style pendants.  It had been a long time since I worked with resin and emphera and I confess I felt both joy and fear in my mad experiments.  And I also felt a strange sense of abandon and release and totally immersed in the act of "play."  Isn't it lovely when that happens?  


As to the process, I started with plain white clay that I lightly textured using fabric as my texture tool.  Then I finger painted various colors very lightly using Genesis Heat set Paints. When all that was completed and baked, I resined the flowers and mod podged the papers.  After everything was dry/cured, I attached the flowers and papers to the baked/painted clay using resin.  That stamp on the pendant on the right I snuck from my boyfriend's collection. I fessed up of course (after the deed was done).

Below is the June challenge picture.

Go here to see more info on the challenge and other entries.  

Saturday, June 25, 2016

Dry Gulch Challenge June 16 - Pretty in pinks

I love a challenge.  This one, sponsored by Dry Gulch Beads, features a particularly pretty, soft palette.   It really inspired me to look through my bead and fiber stash and find a nice soup to mix together.  Here is what I created.


And here is the color palette.  I hit most of the colors though might be difficult to see in this shot.


For more info on the challenge (deadline is June 30 and involves prizes), go here.

You Know you Have an Addiction When...

You go to the local Ben Franklin store for the third straight day just because they are having a 75% Going Out of Business sale!!!!

Well, I actually made and drank a cup of coffee, fed the pups, and took pictures of my beads for an etsy shop posting BEFORE I went back to the Key West Ben Franklin store...for the third day straight. 

 And, I ain't going back again.  So, take a letter Maria.  Address it to my therapist.  Send a copy to my extended family. Got start a new life.  Only some of you will get what I mean by this last paragraph.  oldies but goodies! 

 Anyway, here is my haul.  Filled three of my baskets.  


Friday, June 24, 2016

Before and After - Relishing Redo's

I don't know about you but I relish remaking things.  Not in the moment as I am making them because that is rework.  No, maybe months, even years after.  I have a bag full of jewelry waiting to be remade.  However, I never touch it.  Well, I touch it but mostly put things back.  The jewelry I want to remake and the jewelry I do remake is often the stuff sitting on display in my studio or in my own personal collection.

I have all the pieces I made in the last several months hanging on busts or jewelry stands and every now and again, I scan them for remake potential.   Sometimes the remake is rather simple.  Sometimes it is very messy.  Sometimes it goes into the bag of stuff  to be remade and is never heard from again.

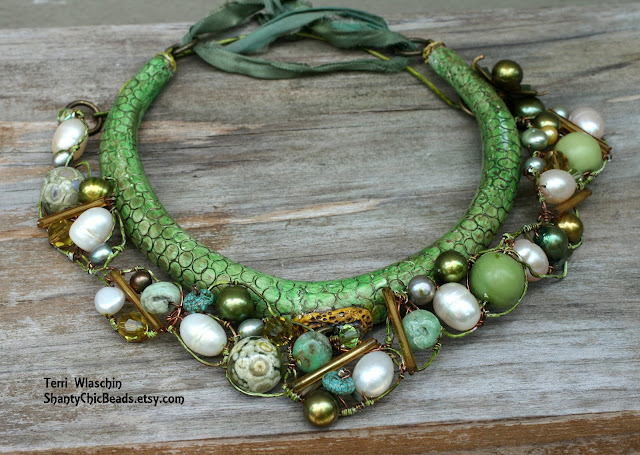
 The remake that is the subject of this post involved two items I am very fond of individually.  And, actually, they can still be worn separately.   The wirework piece which has primarily cultured pearls, jasper, and swarovski crystals started as a rather busy piece.  But, then I removed part of it and created two separate necklaces.  The poly clay snakeskin piece had a couple lives also as shown in the photos below.  Anyhow, I am starting with the final result first and then what follows are the various "before" versions of both pieces. 


The Final version...for now!!!


Below is what the original wirework piece looked like.  Was way too busy but it took me several months to realize that.

 I eventually removed the piece that was on the right hand side and used part of it to create the necklace below.

The remaining piece I put in my personal collection though I have hardly worn it.  See photo below.  This photo is not a very good one but I was too lazy to take a new one.

Here is how the poly clay snakeskin started its life.  Had a bunch of bead woven beads spilling down the neck.  I liked that but got tired of looking at it.


For Version 2 of the Snakeskin necklace, I replace the chain and pendant  for a softer look.  I liked that too but, for now, I like the pearl snakeskin combo.  Will see what happens in a few months.  ha ha.


And that's all for now.

Monday, June 20, 2016

Mini mixed media poly clay portraits


Roberta Marks is a no nonsense artist who creates mixed media artwork that  is "often constructed with curious objects and hints of collected memories."  Having seen her exhibit recently at Key West Customs House, I was inspired to create my own mini mixed media Portrait pendants.  I started with either black, white, or muddy clay backgrounds and cut out various size squares and rectangles to create small abstract like paintings.  Most I textured using fabric or ceramic tiles and things like manual drills, and circle cutters.  In the case of the black and white one with transfer image on side one and white flower on back, I used a marxit tool, which I really liked.  I am thinking of making a blackboard and "chalking" in a saying on it.  

I painted each canvas with Genesis Heat Set paints.  I dressed some of
the canvas' with image transfers or emphera which I mod podged  before applying resin to secure the papers and objects in place. 
Side One - Includes a variety of techniques.  The images with flowers were done by finger painting on Genesis Heat Set paints onto stamps and then stamping on the baked, painted clay.  The bottom pendant has a series of yoga poses I stamped on.


Side Two - same techniques.  For pendant with green cutouts in next to last row, I first painted underneath on baked clay and added a backing which I cut out.
Side One closeup of Top Half
Side one - Closeup of Bottom Half

Side Two - Top Row

Side Two - Middle Row


Side Two - Bottom row


Close up of Letter pendants.  I especially like the pendants on the bottom.  I can see the swirls from the texture pad I used in the one on bottom left and overall it has a really rustic look.  The one on bottom right has 'Floating papers 3D look,"  which I love.


This is one of my more minimalistic "paintings"  I used a combo of finger painting and stamping to get the effect.  I like the idea of painting all around the edges  with messy strokes to give it more the look of a shabby well worn look.


I read somewhere online about using an incense stick to burn edges and holes in paper.  Makes so much sense and was quite fun!  Will try it on fabric too sometime!

Monday, June 6, 2016

Peacock pretty - Before and After

Many years ago when I was just a baby clayer, I took a class with Christie Friesen to make a peacock.  When I finished that class, I was, well, proud as a peacock.

 It's only many years later, when I dusted the piece off again, that I found myself scrunching my nose at it.  If you are a bead or jewelry artist, I think you know exactly the look I mean.  Often accompanied, it is, by a silent "what was I thinking" and then by air involuntarily releasing itself from puffed cheeks.  But I am a real believer that anything can be saved.  And I mean anything (just about).

 And that's where paint comes in, which is my favorite first responder tool.  I used Genesis Heat Set Paints to transform the colors from blah to fab (at least that is what I think today) and threw in some of my painted metal and wirework connectors to redesign the necklace.

Here are the results starting with the AFTER.

The make over results
Below is the BEFORE